Spring的Bean管理
目录
[toc]
Spring的Bean管理
本博客基于SpringSourceCodeTest仓库中【SpringDemo1.0】tag进行的编写。
基于配置文件进行bean管理的方案是Spring初期推行的方式,在历史比较悠久的Spring项目中比较常见。
基于扫描的方式装载bean
一个比较典型的配置文件通常包含<context>标签, <context>用来表示该项目中哪些包中的bean需要被进行生命周期管理。
默认情况下,使用<context>后,Spring会默认扫描定义的带有如下注解的bean:
- @Component
- @Repository
- @Service
- @Controller
- @RestController
- @ControllerAdvice
- @Configuration
参考项目src/main/resources/beans.xml,一个典型的<context>文件如下:
 1<?xml version="1.0" encoding="UTF-8"?>
 2<beans xmlns="http://www.springframework.org/schema/beans"
 3       xmlns:context="http://www.springframework.org/schema/context"
 4       xmlns:xsi="http://www.w3.org/2001/XMLSchema-instance"
 5       xsi:schemaLocation="http://www.springframework.org/schema/beans
 6        http://www.springframework.org/schema/beans/spring-beans.xsd
 7        http://www.springframework.org/schema/context
 8        http://www.springframework.org/schema/context/spring-context.xsd">
 9
10    <!--默认会扫描包文件下的@Controller, @Service, @Repository, @Component等常见注解-->
11    <context:component-scan base-package="com.springtest.demo"></context:component-scan>
12</beans>
XML格式解读
在这份xml中,我们可以稍微简单说明都是做了一些什么事情。
- 首先我们定义了一个
<beans>的大标签,用于生命这个配置文件是用于Spring的生命周期管理,因此我们使用Spring-bean提供的命名空间,"xmlns="http://www.springframework.org/schema/beans"; - 在下文中需要使用
<context>标签,因此我们定义context所使用的命名空间xmlns:context="http://www.springframework.org/schema/context"; - 然后我们定义我们需要扫描的包的位置
<context:component-scan base-package="com.springtest.demo"></context:component-scan>; - 至此我们的xml其实就已经不会报错了,说明此事我们的xml从结构上已经没有明显问题;
- 但是此时启动Spring启动依然会失败并且报错
Cannot find the declaration of element 'beans'.,因此我们需要继续补充这份这份xml的schema文件,用来描述我们的xml中的标签行为; - 此时我们就需要引入我们的
xsi:schemaLocation属性,为此我们首先需要引入xsi的前缀命名空间xmlns:xsi="http://www.w3.org/2001/XMLSchema-instance" - 最后我们补充完整的
xsi:schemaLocation解析我们所引用的两个命名空间"http://www.springframework.org/schema/beans"和"http://www.springframework.org/schema/context"即可。 - 附:xmlns即xml namespace的缩写; xsi即xml schema instance的缩写; xsd即xml schema definition的缩写
 1<?xml version="1.0" encoding="UTF-8"?>
 2<beans
 3       <!-- 表明整个beans标签使用的是xmlns所指向的命名空间 -->
 4       xmlns="http://www.springframework.org/schema/beans"
 5       <!-- 表明子节点中context标签使用的是xmlns:contex所指向的命名空间 -->
 6       xmlns:context="http://www.springframework.org/schema/context"
 7       <!-- 表明xsi属性标签使用的是xmlns:xsi所指向的命名空间 -->
 8       xmlns:xsi="http://www.w3.org/2001/XMLSchema-instance"
 9       <!-- 表明每一个命名空间具体指向的描述文件(xsd文件) -->
10       xsi:schemaLocation="http://www.springframework.org/schema/beans
11        http://www.springframework.org/schema/beans/spring-beans.xsd
12        http://www.springframework.org/schema/context
13        http://www.springframework.org/schema/context/spring-context.xsd">
14
15    <!--默认会扫描包文件下的@Controller, @Service, @Repository, @Component等常见注解-->
16    <context:component-scan base-package="com.springtest.demo"></context:component-scan>
17</beans>
XML内容解读
这里context:component-scan定义了我们的组件扫描的范围,我们直接定义到整个项目的根节点com.springtest.demo,这样这个包内所有的组件都会被扫描并且组装到上下文中供我们使用。
这里我们暂时不深究,留在将来“模仿”Spring的时候再来。
本部分主要测试文件以及相关文件清单为:
- test.ConfigurationTest#test1 -- 测试函数
- src/main/resources/beans.xml -- 配置文件
基于定义的方式装载bean
第二种方式和第一种方式很像,两者可以在同一个xml中同时使用。
<bean>用来表示该项目中context初始化完成后,有哪些bean需要被补充加载,同时这些bean被装载过程中,以及被销毁时,要指定哪些动作,都是在这里定义的。其内部可使用的参数列表如下图所示(我的项目中Spring版本为5.2.2):
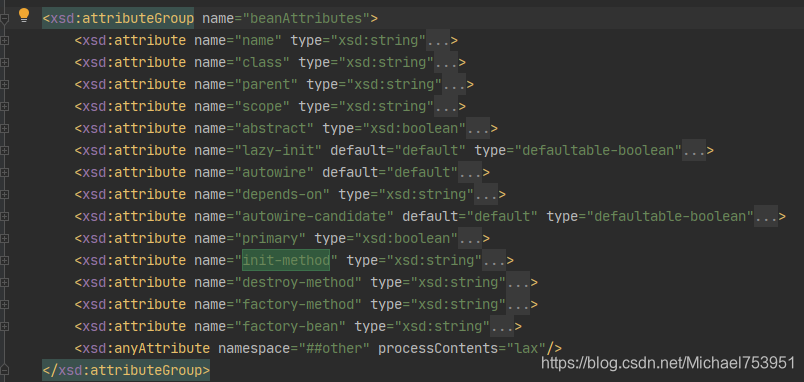
其中我们常用的属性为:
- name: 用于标记bean的名字
- class: 用于标记需要被实例化的class
- scope: singleton表示单例; prototype表示每次getBean会获得一个实例; request表示每次请求获得一个实例; session表示每次灰化获得一个实例
- lazy-init: 表示装载时间,如果为false表示Spring启动时装载,如果为true表示getBean时装载; 默认是false
- init-method: 当bean构造完成并且属性赋值完成之后,装载进context之前被执行的方法,不能带参数,可以抛出异常。
- 也可以通过实现Spring的
InitializingBean接口; - 或者使用标准的
@PostConstruct实现该功能
- 也可以通过实现Spring的
- destroy-method: 当bean被销毁时,需要被执行的方法,不能带参数,可以抛出异常。
- 也可以通过实现Spring的
DisposableBean接口; - 或者实现Java的
Closeable/AutoCloseable接口; - 或者使用标准的
@PreDestroy注解实现该功能
- 也可以通过实现Spring的
- factory-method: 定义实例化对象时调用的函数
一个比较常见的纯使用bean标签定义需要被装载的组件的配置文件如下:
1<?xml version="1.0" encoding="UTF-8"?>
2<beans xmlns="http://www.springframework.org/schema/beans"
3       xmlns:xsi="http://www.w3.org/2001/XMLSchema-instance"
4       xsi:schemaLocation="http://www.springframework.org/schema/beans
5        http://www.springframework.org/schema/beans/spring-beans.xsd>
6
7    <bean id="person" class="com.springtest.demo.entity.Person" name="person" scope="prototype" >
8    </bean>
9</beans>
不难发现,这种方式定义上下文装载bean时,我们不需要对我们的类做任何注解(不需要@Component等)。
本部分主要测试文件以及相关文件清单为:
- test.ConfigurationTest#test1 -- 测试函数
- src/main/resources/beans.xml -- 配置文件
- com.springtest.demo.entity.Person -- 被实例化的类
基于注解的方式装载bean
废话不多说,直接上源码。相关详细测试需要在项目中运行才能直观感受到(ConfigurationTest.test3),这里只做粗略解释。相关内容需要阅读注释和各个注解的源码。
 1package com.springtest.demo.config;
 2
 3import com.springtest.demo.config.typefilter.PersonTypeFilter;
 4import com.springtest.demo.entity.Person;
 5import com.springtest.demo.service.PersonService;
 6import org.springframework.context.annotation.Bean;
 7import org.springframework.context.annotation.ComponentScan;
 8import org.springframework.context.annotation.ComponentScan.Filter;
 9import org.springframework.context.annotation.Configuration;
10import org.springframework.context.annotation.FilterType;
11import org.springframework.stereotype.Controller;
12import org.springframework.stereotype.Service;
13
14// 配置类等效配置文件
15@Configuration(value = "beansConfig2")  // 表示这是一个配置类
16//@ComponentScan(value = "com.springtest.demo" )  // 表示需要扫描的包,可以尝试注释该行然后运行ConfigurationTest.test3查看区别
17@ComponentScan(value = "com.springtest.demo",
18        // 定制扫描规则,默认扫描@Controller, @Service, @Repository, @Component,控制排除哪些组件不需要被包含
19         //excludeFilters = @Filter(type = FilterType.ANNOTATION, classes = Controller.class),
20        useDefaultFilters = false,
21        includeFilters = {// 定制扫描规则,控制只扫描哪些组件,需要关闭默认Filter
22                // @Filter(type = FilterType.ANNOTATION, classes = {Controller.class}), // FilterType.ANNOTATION 按照注解方式进行操作
23                //@Filter(type = FilterType.ASSIGNABLE_TYPE,classes = {PersonService.class}),  // FilterType.ASSIGNABLE_TYPE 按照指定类型的方式进行组件扫描
24                // FilterType.ASPECTJ  比较不常用,指定AspectJ表达式进行组件扫描
25                // FilterType.REGEX  指定符合正则的包进行扫描
26                // FilterType.CUSTOM // 使用自定义规则
27                @Filter(type = FilterType.CUSTOM,classes = {PersonTypeFilter.class})  // 使用自定义规则
28        }
29)
30
31// Component是一个可重复定义组件: @Repeatable
32//@ComponentScan
33public class BeansConfig {
34    @Bean(name = "person3")
35    public Person person01() {
36        Person person = new Person();
37        person.setAge(20);
38        person.setName("lisi");
39        return person;
40    }
41}
上述代码中对@ComponentScan中各种扫描规则以及扫描过程中过滤器@Filter的用法做了一些demo。详细实现需要再运行源码体会一下。主要使用内容如下:
ComponentScan注解:includeFilters需要包含的扫描范围定义excludeFilters不需要包含的扫描范围定义@Filte注解:用于上述两种扫描规则的具体过滤规则定义,其Filterype分为如下几种过滤规则:FilterType.ANNOTATION:对不同的注解进行扫描FilterType.ASSIGNABLE_TYPE:对不同的类名进行规则扫描FilterType.ASPECTJ: 比较不常用,指定AspectJ表达式进行组件扫描FilterType.REGEX: 指定符合正则的包进行扫描FilterType.CUSTOM:使用自定义规则,上述集中规则应该均由该方式实现
注1: 由于Config自身首先需要进行注册然后才能进行相关的执行,因此Config类本身是肯定会被注册的。
本部分主要测试文件以及相关文件清单为:
- test.ConfigurationTest#test2 -- 测试函数
- com.springtest.demo.config.BeansConfig -- 注解扫描的定义类
- com.springtest.demo.entity.Person -- 被实例化的类